What will be
supplied with chemoventory package?
Files structure
of /chemoventory
Download PHP,
MySQL and Zend optimizer programs
Apache installation in Unix/Linux
Installing PHP
and configuring apache server
Chemoventory
directory configuration in Apache
UNIX (Linux, Solaris, FreeBSD) & Mac OSX
To install the Zend Optimizer under Windows
Chemovenetory v2.0 - Web based software
Part- I
PHP (web Server) Installation Notes
This installation document contains screenshot from
windows system, however similar steps will be used for all operating system.
Requirements
Chemoventory is compatible with any operating systems or server, which has PHP, Mysql and Zend Optimizer installed. The most popular systems are Windows /Linux / Unix/BSD/Mac OSX either server or stand alone machine. The machine or server should have local static IP address. You don’t need web hosting services. Networked computer should be sufficient.
Apache/IIS/ other - web server compatible for PHP (free)
PHP 4.1 and above – web application server (free)
Mysql (may be Free) - database
Zend Optimizer - PHP accelerator (free). Not required for developer version.
What will be supplied with chemoventory package?
Your chemoventory package should have more than 80 files, most of them are php files and few sql scripts to install database and few other files. Chemoventory package do not have any of the above programs (php, mysql, zend optimizer etc) or documentations.
Many of the php files of Standard and Lite version are not readable files. They are binary files and should be transferred as binary.
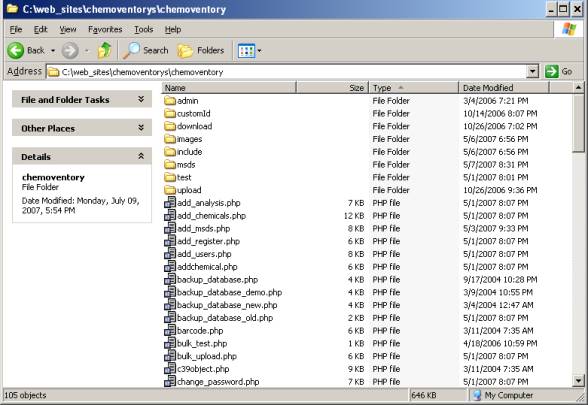
Files structure of /chemoventory
/chemoventory – major files
/chemoventory/include/ - certain files to configure the system
/chemoventory/test/ - test php and mysql installation
/chemoventory /download * - Bulk upload template
/chemoventory/upload * - Temporary place to upload Bulk upload
/chemoventory/msds * - MSDS file locations
/chemoventory/analysis *
/chemoventory/admin * - chemoventory admin files
Not required/available in Lite version
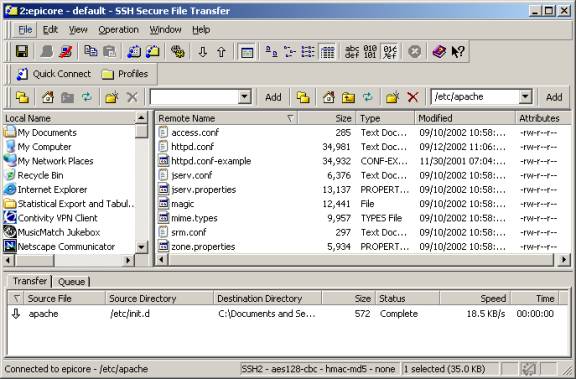
Once you received the package, please make a backup copy, preferably in CD. Unpack the chemoventory distribution package and install in chemoventory directory.
e.g. c:/web/chemoventory or /home/chemoventory/www/
In unix system, you need to have appropriate file permissions.
Download PHP, MySQL and Zend optimizer programs
Please note these links keep changing from time-to-time. So the links might have been broken. All programs are available as free software either under open source or GPL.
Download apache2.0 or 1.3
Download php 4.1.0 or above, please select binary version (PHP 5 is Preferred)
http://www.php.net/downloads.php
Download mysql mysql version (4.1)
http://www.mysql.com/downloads/
Download Zend Optimizer ( free – but not open source)
We have some local copy http://s114095313.onlinehome.us/download/zendencoder/zend.html
Apache Installation
PHP is web application server (something similar to several java web server). Before installing web application, we need web server apache or IIS.
Apache installation in Unix/Linux
gunzip apache_1.3.x.tar.gz
tar xvf apache_1.3.x.tar
cd apache_1.3.x
./configure --prefix=/www
cd ../php-x.x.x
./configure --with-mysql --with-apache=../apache_1.3.x --enable-track-vars
make
make install
cd ../apache_1.3.x
./configure --activate-module=src/modules/php4/libphp4.a
make
make install
Use your normal procedure for restarting the Apache server. (You must
stop and restart the server, not just cause the server to reload by
use a HUP or USR1 signal.)
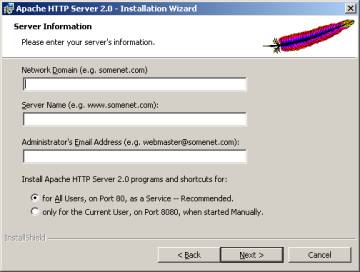
Windows Apache installation
In windows use default installation and settings and install apache. Remember to add appropriate server name and domain name
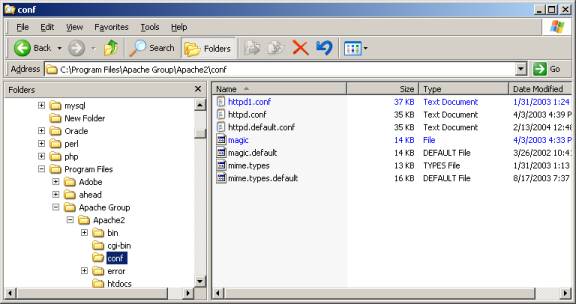
To add web alias edit the httpd.conf file, which is usually located under
C:\Program Files\Apache Group\Apache2\conf\ or /etc/apache/conf/ directory
IIS Web server (Windows only)
IIS is Microsoft web server and available only in windows system. Make sure IIS is installed and running. If you are not sure, open browser and type the url
If you see error message or not working, your system does not have IIS or any web server not installed. Check your services by Windows à settings à control Panelà Administrative tools à Services or
Once IIS is installed, open the chemoventory web directory and share the directory. (XP and in some windows 2000 it is possible). In IIS windows XP right click and select sharing and security, you will see the window below.
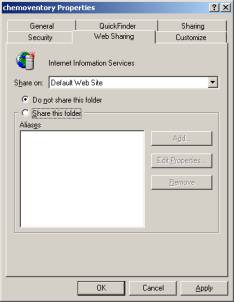
For other windows versions, you have to find the IIS
Windows à settings à control Panel tools à IIS à Administrative
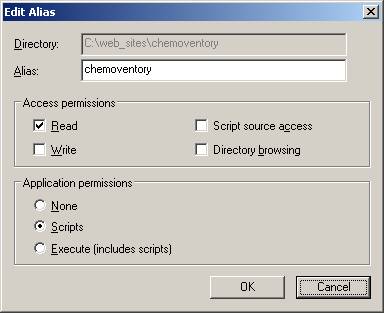
And create web alias “chemoventory” for the physical directory
Windows php installation
http://us2.php.net/install.windows
Download php binary with installer package. Install with default options. If you are using IIS, the installer will configure the all files to be copied in different location. TO manually install PHP or to configure with apache use the method given below
Installing PHP and configuring apache server
Unix only…
gunzip php-x.x.x.tar.gz
tar xvf php-x.x.x.tar
cd ../php-x.x.x
cp php.ini-dist /usr/local/lib/php.ini
Windows only …
1. Copy the php
files under a directory (for example : c:\php\)
(be careful don't use c:\Program Files\php\ because of the space between
Program and Files)
2. copy php4ts.dll , php4isapi.dll & libmysql.dll (if php5) from the directory to WINNT/system or WINDOWS/system32 directories
Copy the php4apache.dll or relevant file to module directory
And restart web server
windows & unix
3. php.ini-dist from your installation directory to the c:/WINDOWS/ or c:/winnt/
directory and rename it to php.ini . Unix users can find it in “/etc/httpd/php.ini”
4. Edit php.ini file to indicate in which directory you have copied your php files.
(extension_dir = c:\php\extensions ; directory in which the loadable extensions (modules) reside.)
5. In the php.ini file edit to enable mysql and gd2 extensions in the php by un-commenting extension=php_gd2.dll & extension=php_mysql.dll
PHP 5 by default does not have mysql enabled. For windows php4 by default mysql has been enabled
6. Edit php.ini file to have
short_open_tag = On
Instead of system defined path use system path defined by you
session.save_path = "C:\temp"
sample php.ini file is provided (windows, apache) http://www.chemoventory.com/documents/php.init.txt
and sample php info is also here (windows, pache) http://www.chemoventory.com/documents/php_info.pdf
(linux, apache) http://s114095313.onlinehome.us/demo/test/test.php
7. Edit the httpd.conf file using text editor or create one using the httpd.conf example provided there.
Add the following or for Apache2.0 Near line # 173 make sure this line is present and uncommented
LoadModule php4_module modules/php4apache2.dll
If apache 1.3 or 1.2
LoadModule php4_module c:/php/sapi/php4apache.dll
AddType application/x-httpd-php .php
The following additional configuration in apache httpd.conf will enhance apache & PHP server (near line 320)
DirectoryIndex
index.html index.html.var index.php

unix or dos command line users can restart apache by #apachectl stop; #apachectl start
Chemoventory directory configuration in Apache
add chemoventory files location in the http.conf file near or after alias
Alias
/chemoventory/ "C:/web/chemoventory/"
<Directory
"C:/chemoventory">
Options
Indexes FollowSymlinks MultiViews
AllowOverride Indexes
Allow from
all
</Directory>
Restart apache and make sure you see something in your browser for this url http://localhost/ and or for this http://localhost/chemoventory/test/index.html
Testing PHP installation
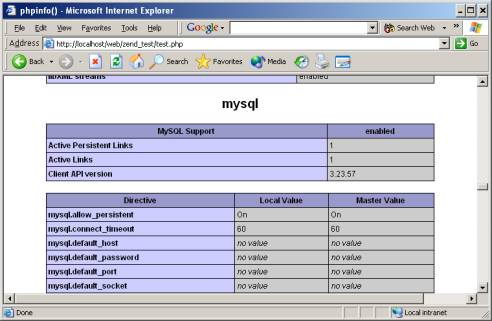
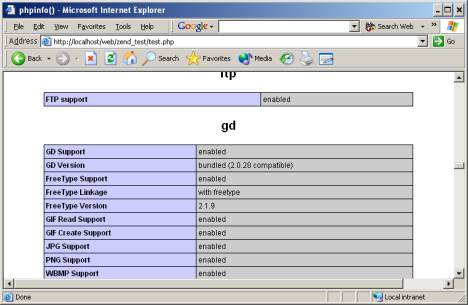
Open your systems browser with the following URL http://localhost/chemoventory/test/test.php You should see something like shown below. Note the PHP version. Otherwise, please troubleshoot your php.ini configuration and web configuration. Several forums are available to support. Also write to admin@chemolink.com

Common pitfalls:
Web server not installed
Web service was not running (check your web service either from services in windows or #ps –al | grep –v apache
Web alias not set properly
php.ini not configured properly
You should also see the following in the similar page contents, if mysql configuration in php is set properly. Prior to configuring php in mysql, you should have installed mysql.
Pitfall: extension location not pointed properly
Some of the php specific .dll or *.so were not copied in the directory mentioned
Configuring email in php
1. You need to update the php.ini file according to your
configuration. Here is some of the lines where you need to edit the file: “;”
means this line is commented out. Set smtp, smtp_port, sendmail_from etc.
[mail function]
; For Win32 only.
SMTP = smtp.sbcglobal.yahoo.com
smtp_port = 25
; For Win32 only.
sendmail_from = admin@chemolink.com
; For Unix only. You may supply arguments as well (default:
"sendmail -t -i").
;sendmail_path =
2. Test email functionality in chemoventory/test/test_email.php
http://localhost/chemoventory/test/test_email.php
You should get email. Otherwise configure further and retest this step. If the
SMTP is not accessible, you should try using pear library configuration in the
following files.
3. Files in /chemoventory/include
section send_email.inc.php,
send_email_pear.inc.php and send_email_smtp.inc.php
Depending on the smtp or pear
configuration, you should edit the
file send_email.inc.php
accordingly.
By default this line is commented, uncomment this line, if you want to use SMTP
@mail($email ,$subject, $text )
To configure php-pear
go to dos command line and type the following: (assuming default pear path)
c:/php> php c:/php/pear/go-pear.php
accept all defaults
Make sure this file exists c:/php/pear/pear/Mail.php
or appropriately change the path
restart webserver
Edit t send_email.inc.php file to enter values for
$headers["From"]
$params["host"]
If authentication is required (some email system requires authentication)
$params["auth"] = true;
$params["username"] = "username";
$params["password"] = "password";
Installing Zend Optimizer
UNIX (Linux, Solaris, FreeBSD) & Mac OSX
To install the Zend Optimizer under UNIX or Mac OSX
1. Execute the following command and follow the instructions:
./install.sh
Note Be sure to download the Zend Optimizer version that corresponds
with the platform you use.
2. If you are running under Apache, restart your Apache Web server. For Apache V1.3,
use the commands:
apachectl stop; apachectl start
OpenBSD, Solaris/x86
To install the Zend Optimizer under these platforms
1. Unzip the package file by running the command
gunzip -c <package name> | tar xvf -
2. The unzipped files is placed in a directory with the same name as the package but
without the .tar.gz suffix.
Copy the ZendOptimizer.so file to your system. It is suggested to copy into the
directory /usr/local/Zend/lib.
3. Add the following lines to your php.ini file (preferably into /usr/local/lib).
Do not add any extra spaces or tabs:
zend_optimizer.optimization_level=15
zend_extension="/usr/local/Zend/lib/ZendOptimizer.so"
To install the Zend Optimizer under Windows
1. To ensure that your PHP installation is compatible with the Zend Optimizer, it is
recommended to use the Windows packages posted in the Zend Store which are
compiled in non-debug mode The Zend Optimizer works only with non-debug PHP
binaries.
2. The Zend Optimizer for Windows package is a self-extracting installer. Simply run
the package file, and follow the installation instructions.
3. If you are running a server module (e.g. ISAPI), restart your server. For Microsoft
IIS, run net stop iisadmin, and then net start w3svc, from a command line console.